Kubernetes offers various deployment options, and among the many tools available, kops stands out for its ease of use and high level of integration. This article will provide an in-depth introduction to kops and guide readers through the practical steps of quickly setting up a Kubernetes cluster in an OpenStack environment.
Table of Contents
What is kops?
kops, which stands for Kubernetes Operations, is, as the name suggests, a tool specifically designed for Kubernetes cluster operations and maintenance. The main features of kops are as follows:
- Supports creating, maintaining, upgrading, and destroying Kubernetes clusters
- Supports multiple cloud platforms, such as AWS, OpenStack/DigitalOcean (Beta), and Azure/GCP (Alpha)
- Generate cluster Terraform templates via kops
- Manage Kubernetes cluster plugins
- Automated deployment of Kubernetes clusters
kops Terminology
Storage
STATE_STORE
The STATE STORE defines where kops needs to store its data. The data stored by kops includes the cluster spec, instance groups, SSH keys, and more.
API
Cluster spec
The Cluster spec defines the specifications required for the cluster itself, such as information regarding DNS, Load Balancers, and the etcd cluster within the cluster.
Instance Group
The Instance Group defines relevant data for the actual worker nodes, master nodes, and etcd nodes. In the case of OpenStack, this includes the flavors and images used by the virtual machines to be created.
Cloud
The Cloud
The Cloud defines a unified Golang interface for different cloud platforms. Since kops supports many different cloud environments, it uses this interface for abstraction.
Tasks
A task is an API call performed on the cloud environment.
Model
The Model maps the contents of the previously defined cluster spec to actual tasks.
For example, if we define a load balancer in the cluster spec, the loadbalancer model will map it to the various API calls required to actually create a load balancer.
Installing kops
Prerequisites
Before installing kops, you need to install kubectl. Please refer here for installation instructions.Official Documentation
Install via Homebrew
brew update && brew install kopsInstall via official pre-compiled releases
Linux
curl -Lo kops https://github.com/kubernetes/kops/releases/download/$(curl -s https://api.github.com/repos/kubernetes/kops/releases/latest | grep tag_name | cut -d '"' -f 4)/kops-linux-amd64
chmod +x kops
sudo mv kops /usr/local/bin/kops
Mac
curl -Lo kops https://github.com/kubernetes/kops/releases/download/$(curl -s https://api.github.com/repos/kubernetes/kops/releases/latest | grep tag_name | cut -d '"' -f 4)/kops-darwin-amd64
chmod +x kops
sudo mv kops /usr/local/bin/kops
Build from source
If you are compiling it yourself, please ensure that Golang is installed in your environment and that GOPATH and GOBIN are properly configured.
git clone git@github.com:kubernetes/kops.git
cd kops
make
Lab: Creating a Kubernetes Cluster
Download OpenStack Credentials
Note
Please contact the administrator to enable load balancer permissions.
Go to the OpenStack dashboard -> Identity / Application Credentials, and select "Create Application Credential" in the top right corner.
Using CNTUG Infra Lab as an example, the link is located at: https://openstack.cloudnative.tw/identity/application_credentials/
Once created, click "Download openrc file" to download a shell script file.
After downloading, you will need to load the information from the RC file into your shell environment variables.
source openrc.sh
export OS_DOMAIN_NAME=Default
Configure kops STATE_STORE
kops requires a storage location for its data, which is the STATE_STORE mentioned above.
Since Infra Labs provides Swift service, we can use it directly.
export KOPS_STATE_STORE=swift://kopsCreate Kubernetes Cluster Template
Next, use kops to create the cluster data; it's simple and only requires a single command:
Note
Please replace the following in the command:
跟
kops create cluster \
--cloud openstack \
--name <cluster_name>.k8s.local \
--state ${KOPS_STATE_STORE} \
--zones nova \
--network-cidr 10.0.0.0/24 \
--image Ubuntu-22.04 \
--master-count=3 \
--node-count=1 \
--node-size m1.small \
--master-size m1.small \
--etcd-storage-type NVMe \
--api-loadbalancer-type public\
--topology private \
--bastion \
--ssh-public-key <ssh_key_path> \
--networking calico \
--os-ext-net public \
--os-dns-servers=8.8.8.8,8.8.4.4 \
--os-octavia=true \
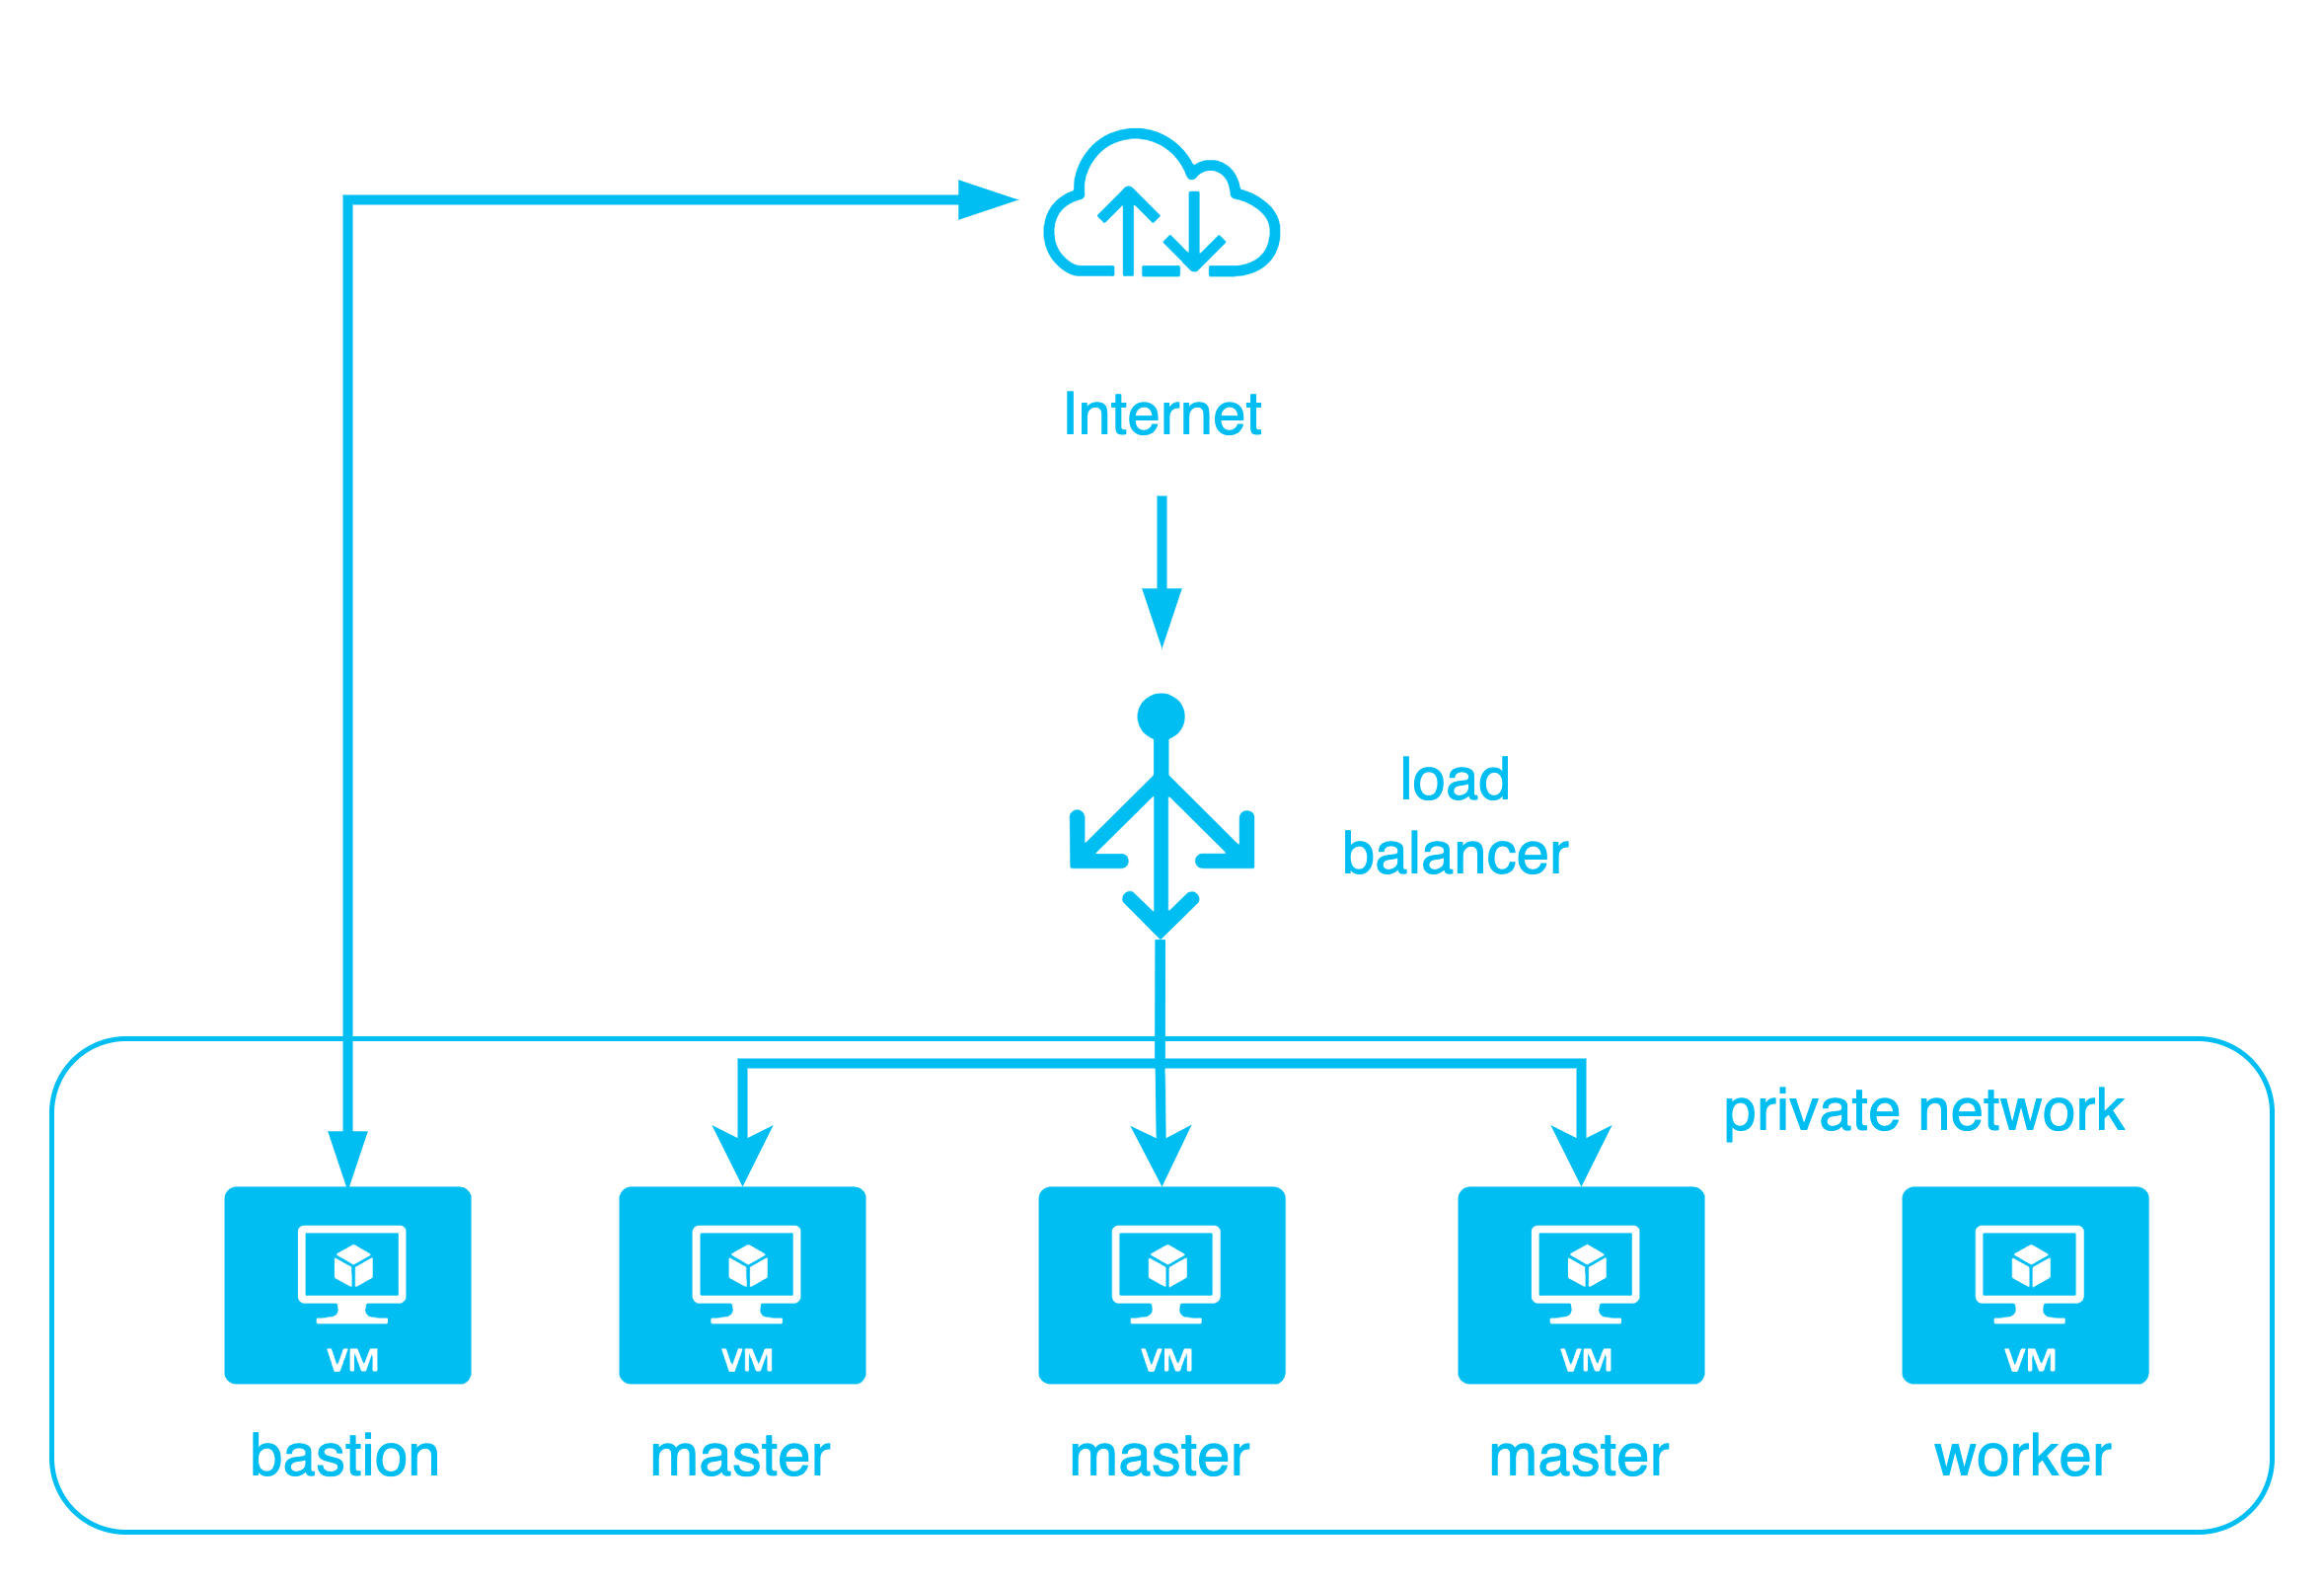
--os-octavia-provider=ovnIn this lab, we will create a 4-node cluster, consisting of 3 master/etcd nodes and 1 worker node.
The architecture diagram is as follows:
kops create cluster This will create the cluster spec, instance groups, and other data. Next, you need to use: kops update cluster to actually create the Kubernetes cluster.
kops update cluster --name <cluster_name> --yes --adminAt this point, kops will begin calling the OpenStack API to create the VMs, networks, disks, load balancers, and other resources required for the Kubernetes cluster. Once finished, wait approximately 5-10 minutes for the entire cluster to start up.
At this point, the configuration for this newly created Kubernetes cluster will be written to ~/.kube/config 下
Note
If a 409 error occurs during the update and the load balancer on the OpenStack Dashboard is in the PENDING_UPDATE state, please contact the administrator.
Verify Kubernetes Cluster
Finally, we can verify that the Kubernetes cluster was installed successfully.
kops validate cluster --wait 5mYou will get the following output:
Validating cluster igene.k8s.local

INSTANCE GROUPS
NAME        ROLE    MACHINETYPE MIN MAX SUBNETS
bastions    Bastion m1.tiny     1   1   nova
master-nova-1   Master  m1.small    1   1   nova
master-nova-2   Master  m1.small    1   1   nova
master-nova-3   Master  m1.small    1   1   nova
nodes-nova  Node    m1.small    1   1   nova

NODE STATUS
NAME            ROLE    READY
master-nova-1-nvhtbc    master  True
master-nova-2-jgnhbo    master  True
master-nova-3-vllcwf    master  True
nodes-nova-yxorvl   node    True

Your cluster igene.k8s.local is ready
At this point, you can use kubectl to perform operations on the cluster.
Clusters installed using kops have, by default, already installed cloud-provider-openstack and integrated features such as Cinder CSI and Octavia Load Balancer.
kubectl get csidrivers.storage.k8s.io
NAME                       ATTACHREQUIRED   PODINFOONMOUNT   STORAGECAPACITY   TOKENREQUESTS   REQUIRESREPUBLISH   MODES                  AGE
cinder.csi.openstack.org   true             true             false             <unset>         false               Persistent,Ephemeral   13h
Delete Kubernetes Cluster
kops records all the resources it creates on OpenStack, so destroying the Kubernetes cluster and releasing the resources is very simple, requiring only a single command:
kops delete cluster <cluster_name> --yeskops will delete all resources created on OpenStack.
Summary
In this lab, we demonstrated how to use kops to create a complete Kubernetes cluster on OpenStack. The cluster built by kops also integrates cloud-provider-openstack related features, allowing users to directly use persistant volume 和 load balancer and other features within the cluster.
For subsequent Kubernetes-related labs, it is also recommended to use this method to set up a Kubernetes cluster.
Appendix
Add instances with different flavors
kops can add instances of different flavors and quantities through instance groups.
Instance groupExample as follows:
apiVersion: kops.k8s.io/v1alpha2
kind: InstanceGroup
metadata:
  labels:
    kops.k8s.io/cluster: <cluster_name>.k8s.local
  name: nodes-nova-arm
spec:
  image: Ubuntu-22.04-aarch64
  machineType: a1.large
  maxSize: 1
  minSize: 1
  role: Node
  subnets:
  - nova
Use the following commands to create an instance group and update the cluster to create new instances.
cat ig.yaml | kops create -f -

kops update cluster --name <cluster_name>.k8s.local --yes --admin
New instances will be created and added to the cluster.

This is the kind of quality content I love to see.